ModRex
From OpenSimulator
| Line 9: | Line 9: | ||
(sub-meshes) and can include a skeleton for defining avatar motion and dynamics. | (sub-meshes) and can include a skeleton for defining avatar motion and dynamics. | ||
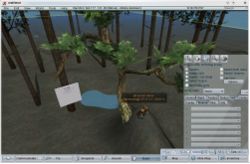
| − | Here is an image built from using Opensim+ModReX | + | Here is an image built from using Opensim+ModReX [[image:modrex.jpg|250px|thumb|left|ModRex with mesh support, running on Linux]] and a [http://www.youtube.com/watch?v=yEXqiv2_kbE&feature=channel_page movie] to illustrate some of the mesh and lighting effects in the viewer: |
| − | [[image:modrex.jpg|250px|thumb|left|ModRex with mesh support, running on Linux]] and a [http://www.youtube.com/watch?v=yEXqiv2_kbE&feature=channel_page movie] to illustrate some of the mesh and lighting effects in the viewer: | + | |
To use modrex, you need the following: (1) The RealXtend viewer, (2) ModReX, and (3) OpenSim. | To use modrex, you need the following: (1) The RealXtend viewer, (2) ModReX, and (3) OpenSim. | ||
Revision as of 07:40, 10 February 2009
Contents |
Overview
ModRex is a joint effort between RealXtend and OpenSim developers to make it possible to join the RealXtend viewer to the OpenSim codebase. The RealXtend viewer is based on the opens source OGRE game engine and differs from the Linden Lab viewer in several ways. The most distinct difference is in the new rendering potential offered by OGRE. When using RealXtend as a viewer for OpenSim, one obtains real-time shadows, improved lighting simulation, and more importantly, the OGRE mesh. The mesh is hierarchical (sub-meshes) and can include a skeleton for defining avatar motion and dynamics.
Here is an image built from using Opensim+ModReX and a movie to illustrate some of the mesh and lighting effects in the viewer:To use modrex, you need the following: (1) The RealXtend viewer, (2) ModReX, and (3) OpenSim. The viewer (1) is downloaded from here. Make sure to download the latest viewer and any patches that have been added since that viewer version. They should be located on in the sourceforge page. For Windows, the viewer is run directly as an .exe, and for Linux, wine is used to launch the viewer. OpenSim (3) is compiled as instructed elsewhere in this wiki (Get OpenSim and Building). The setup for ModRex is documented below for Windows and Linux.
Setup
Windows
Linux
mkdir /opt/opensim opt/opensim/simulator /opt/opensim/authentication /opt/opensim/avatarstorage /opt/opensim/builds
cd /opt/opensim/builds/8218
svn co http://opensimulator.org/svn/opensim/trunk .
sh runprebuild.sh
nant
mkdir modrex modrex/build
cp -R bin/*.dll modrex/build
cd modrex
svn checkout http://forge.opensimulator.org/svn/modrex/trunk .
cd ModularRex
vi prebuild.xml
- Change each ../../../bin to ../../build, and each ../../bin to ../build, save and exit
mono ../../bin/Prebuild.exe /target monodev
- Open /opt/opensim/builds/8218/OpenSim.sln with MonoDevelop
- Add existing project > modrex/ModularRex/RexFramework/ModularRex.RexFramework.mdp
- Add existing project > modrex/ModularRex/NHibernate/ModularRex.NHibernate.mdp
- Add existing project > modrex/ModularRex/RexOdePlugin/ModularRex.RexOdePlugin.mdp
- Add existing project > modrex/ModularRex/ModularRex.mdp
- Change the runtime version for these projects to mono 3.5
- Replace the broken OpenSim reference in the ModularRex project with the equally named OpenSim project
- Replace the broken OpenSim.Region.Physics.Meshing and OpenSim.Region.Physics.OdePlugin references in the RexOdePlugin project with the equally named OpenSim projects
- Build the modularRex projects. If no errors occured, The dll's are stored in /opt/opensim/builds/8218/modrex/build
cp /opt/opensim/builds/8218/modrex/build/ModularRex.* /opt/opensim/builds/8218/bin
- Copy python-engine dependencies
 cp -R /opt/opensim/builds/8218/modrex/ModularRex/RexParts/RexPython/Resources/* /opt/opensim/builds/8218/bin/ScriptEngines
cd /opt/opensim/builds/8218/bin
cp OpenSim.ini.example OpenSim.ini
- edit OpenSim.ini, and add this:
;This goes under [startup]
rex_python = true
[realXtend]
enabled = true
db_connectionstring = "MySQLDialect;MySqlDataDriver;Data Source=localhost;Database=opensim;User ID=root;Password=mypw;"
- Copy the modrex enabled OpenSimulator to the production dir
cp -R /opt/opensim/builds/8218/* /opt/opensim/simulator
- Add the rex mysql tables to the opensim database
- Download and build the authentication service
svn co https://realxtendserver.svn.sourceforge.net/svnroot/realxtendserver/authentication/tags/0.4 /opt/opensim/authentication
cd /opt/opensim/authentication
mono bin/Prebuild.exe /target nant
nant
- Create a mysql database "authentication"
cd bin
mono Authentication.exe
- Setup authentication
MySql_SqlHandler.dll (or SQLite_SqlHandler.dll. MySql_SqlHandler.dll gives not implemented messages but seems to work ok)
<enter>(AuthenticationEngine=AuthenticationEngine.dll)
<enter>(logging enabled=False)
<enter>(def. region x 1000)
<enter>(def. region y 1000)
<enter>(avatarstorageurl 172.16.1.65:10000)
<enter>(default gridurl 172.16.1.65:9000)
<enter>(default dns)
<enter>(dbserver 127.0.0.1)
<enter>(dbname authentication)
<enter>(dbuser root)
*******(dbpw for root)
172.16.1.65 (httpsettings LAN-IP)
The authentication daemon should run by now
- Create a user in the authentication screenconsole
create user
- Download and build the avatarstorage service
svn co https://realxtendserver.svn.sourceforge.net/svnroot/realxtendserver/avatarstorage/tags/0.4 /opt/opensim/avatarstorage
cd /opt/opensim/avatarstorage
bin/Prebuild.exe /target nant
nant
- Create a database "avatarstorage"
cd bin
mono AvatarStorage.exe
- Setup avatarstorage
MySql_SqlHandler.dll
<enter>(AuthenticationEngine.dll)
<enter>(Inventory True)
<enter>(PersonalInventoryService.dll)
PersonalInventory.SQLITE.dll
<enter>(logging_enabled False)
<enter>(dbserver 127.0.0.1)
avatarstorage (dbname)
<enter>(dbuser root)
********(dbpw root)
172.16.1.65 (httpsettings LAN-IP)
<enter>(http port 10000)
<enter>(ssl False)
The avatarstorage daemon should run by now
- You can use this rex serverscript to manage and start the services(uses screen)
Most important screen-commands are:
screen -list (shows screen sessions)
screen -r screenname (attaches to the screensession)
ctrl-a + d (detaches from the screensession)
the 'Account' part is the first part in your rex-username(account@myauthenticationdaemonuri)
- Check in the Simulator console if everything started the way it's supposed to
Once the three services are running, an initial user was made, fire up the realXtend client from wine and login with your credentials.
Known Quirks
- Shift-copy a mesh leaves a prim behind
- Avatar is stored, but appearance changes only after viewer restart
Recent Fixes
- NHibernate-db supports mysql, sqlite and mssql2005. Meshes are persistant
- Mesh collisions work
- Python scripting works

